あるとき私は学校の演習にて、Androidアプリ内でローカルに物体検出をする機会があった。私はDAMO-YOLOという物体検出モデルを使用することにした。そのときの覚書としてこの記事を書いておく。
この手の分野に関して初学者であるため、間違っている部分があるかもしれないが、そこは目を瞑ってほしい。
本記事中のソースコードはApache 2.0の下で利用可能である。
DAMO-YOLOとは
Alibaba Groupによって開発された、物体検出モデル
実装
前処理
モデルに画像を入力する際、そのまま画像のバイナリデータをぶち込むことはできない。変換が必要。
具体的にはNCHW形式に変換してやる必要がある。
NCHW形式とは
各アルファベットの意味としては以下の通りN: バッチサイズ (画像の数)
C: チャンネル数 (色の種類)
H: Height (高さ)
W: Width (幅)
これらをN, C, H, Wの順番に並べたもの
ソースコード
DAMO-YOLOの場合、入力画像は640×640にしてやる必要がある。
private float[][][][] preprocess(Bitmap bitmap) {
    Bitmap resized = Bitmap.createScaledBitmap(bitmap, 640, 640, true);

    // Onnxでは入力する画像をNCHW形式にする必要がある
    // N: バッチサイズ (画像の数) 1
    // C: チャンネル数 (色の種類) 3
    // H: Height (高さ) 640
    // W: Width (幅) 640
    // [1 3 640 640]
    float[][][][] inputData = new float[1][3][640][640];
    for (int y = 0; y < 640; y++) {
        for (int x = 0; x < 640; x++) {
            int pixel = resized.getPixel(x, y);
            float r = Color.red(pixel);
            float g = Color.green(pixel);
            float b = Color.blue(pixel);

            // モデルによってはRGB値を0〜255ではなく0.0〜1.0、-1.0〜1.0に変換する必要があるが、DAMO-YOLOの場合は必要ない?
            // 両者共に試してみたが、元の0〜255の値でしか動作しなかった
            inputData[0][0][y][x] = r;
            inputData[0][1][y][x] = g;
            inputData[0][2][y][x] = b;
        }
    }

    return inputData;
}後処理
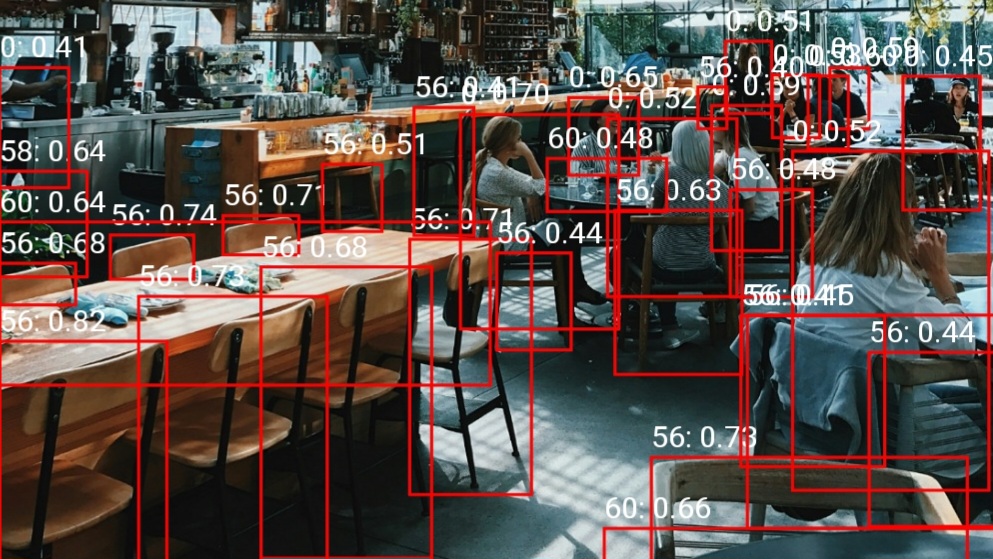
出力されたものはそのままだと重複だらけで使い物にならない。不要なものを排除していく処理が必要になる。
そこで使うのがNMS(Non-Maximum Suppression)とIoU(Intersection over Union)である。
NMS(Non-Maximum Suppression)とは
モデルが検出した物体の候補を整理するための後処理アルゴリズム
物体検出AI(YOLOやSSDなど)は、1つの物体に対して複数の重複したバウンディングボックス(BBox: 矩形の囲み)を検出してしまうことがよくある。NMSは、これらの重複した検出結果(BBox)の中から、最も信頼度(スコア)が高いBBoxを1つだけ残し、それ以外を抑制(削除)する処理を指す。
IoU(Intersection over Union)とは
2つのバウンディングボックス(BBox: 矩形の囲み)がどれだけ重なっているかを測定するための指標
ソースコード
これら2つを組み合わせて、「1つの物体に対して複数の重複したバウンディングボックス」がある状態を解消していく。
具体的には、「信頼度が最も高いBBox」と「その他のBBox」のIoUを計算し、その値が高い(重複度が高い)ものを削除していく。
今回はとりあえず重複を排除できればよかったので、クラスごとでの算出などは割愛している。
実装にあたっては、主に以下のサイトを参考にさせていただいた。
https://note.com/kikaben/n/nf4ddafd80492
https://qiita.com/CM_Koga/items/82d446658957d51836cf
https://qiita.com/k-akiyama/items/89714d276871ea339aa9
private List<Detection> postprocess(float[][] scores, float[][] bboxes, int imgW, int imgH, float scoreTh, float nmsTh) {
    float scaleX = (float) imgW / 640;
    float scaleY = (float) imgH / 640;

    List<Detection> detections = new ArrayList<>();
    int numClasses = scores[0].length; // 分類の数を取得
    for (int i = 0; i < bboxes.length; i++) {
        int bestClass = -1;
        float bestScore = 0;
        for (int j = 0; j < numClasses; j++) {
            if (scores[i][j] > bestScore) {
                bestScore = scores[i][j];
                bestClass = j;
            }
        }
        if (bestScore > scoreTh) {
            float[] box = bboxes[i];
            float x1 = box[0] * scaleX;
            float y1 = box[1] * scaleY;
            float x2 = box[2] * scaleX;
            float y2 = box[3] * scaleY;
            detections.add(new Detection(x1, y1, x2, y2, bestScore, bestClass));
        }
    }
    return nms(detections, nmsTh);
}

private List<Detection> nms(List<Detection> detections, float nmsTh) {
    // NMSを実装
    // TODO: クラスごとでの算出
    // 最も信頼度の高いボックスの抽出するために、スコアで降順に並び替える
    Collections.sort(detections, (a, b) -> Float.compare(b.score, a.score));
    List<Detection> keep = new ArrayList<>();
    for (Detection detection : detections) {
        boolean keepDetection = true;
        for (Detection k : keep) {
            if (iou(detection, k) > nmsTh) {
                keepDetection = false;
                break;
            }
        }
        if (keepDetection) {
            keep.add(detection);
        }
    }
    return keep;
}

private float iou(Detection a, Detection b) {
    // IoUを実装
    // 2つの領域がどれくらい重なっているかをあらわす指標
    // YOLO系では仕様上重複ありきのため、IoUで重なり具合を算出する
    // https://qiita.com/CM_Koga/items/82d446658957d51836cf
    // https://qiita.com/k-akiyama/items/89714d276871ea339aa9
    float xx1 = Math.max(a.x1, b.x1);
    float yy1 = Math.max(a.y1, b.y1);
    float xx2 = Math.min(a.x2, b.x2);
    float yy2 = Math.min(a.y2, b.y2);
    float w = Math.max(0, xx2 - xx1);
    float h = Math.max(0, yy2 - yy1);
    float inter = w * h;
    float areaA = (a.x2 - a.x1) * (a.y2 - a.y1);
    float areaB = (b.x2 - b.x1) * (b.y2 - b.y1);
    return inter / (areaA + areaB - inter);
}全体のソースコード
今回取り扱った内容はGitHubにサンプルコードを上げている。詳しいことはそちらを参照してほしい。